This tutorial teaches you how to find and fix most errors you may encounter while coding.
Remember that those tutorials expects you to have some kind of programming experience, and they reflect my personal experience and may not agree with everyone.
What is Debugging?
Debugging is finding and removing errors (known as bugs) in your project. The term “bug” comes from when computers were massive machines, the size of rooms or whole buildings, and sometimes problems appeared when a real living bug crawled somewhere it wasn’t supposed to.
Are there special ways to find bugs?
Actually, yes! While a lot of those ways are just what people eventually defaulted to, due to practical reasons or not, there are specialized tools to help you debug most things. But I won’t be using anything besides what Visual Studio gives you already.
So what we gonna do?
Because this lesson is a little special, we won’t be making anything from scratch.
I will put the whole code up front, so you can copy and paste it in your project.
using UnityEngine;

[RequireComponent(typeof(MovementScript))]
public class PlayerController : MonoBehaviour {

    MovementScript movementScript;

    void Update() {
        Move();
        Jump();
    }

    void Move() {
        movementScript.Move(Vector3.forward * Input.GetAxis("Vertical") + Vector3.right * Input.GetAxis("Horizontal"));
    }

    void Jump() {
        if (Input.GetButton("Jump") && movementScript.bGrounded) {
            movementScript.Jump();
            movementScript.bGrounded = false;
        }
    }
}
using UnityEngine;

[RequireComponent(typeof(Rigidbody))]
public class MovementScript : MonoBehaviour {

    Rigidbody _rb;

    public float speed, jumpSpeed;

    [SerializeField]
    LayerMask groundMask;

    public bool bGrounded;

    [SerializeField]
    float groundCheckRadius = 0.5f;

    Vector3 movementInput;

    private void Awake() {
        _rb = GetComponent<Rigidbody>();
    }

    void FixedUpdate() {
        if (!bGrounded) {
            bGrounded = Physics.Raycast(transform.position, Vector3.down, groundCheckRadius, groundMask);
        }

        _rb.velocity = movementInput * speed * Time.fixedDeltaTime;
    }

    public void Move(Vector3 moveInput) {
        movementInput = Vector3.ClampMagnitude(moveInput, 1f);
    }

    public void Jump() {
        _rb.AddForce(Vector3.up * jumpSpeed);
    }
}
To finish the setup, right click on an empty space at your Hierarchy window in Unity3D and create a cube (3DObject > Cube).
Set your cube’s Transform to:
Position: (0, 0, 0)
Rotation: (0, 0, 0)
Scale: (50, 1, 50)
This should give you a very large rectangle.
Now repeat the operation but creating a sphere instead (3DObject > Sphere).
Set your sphere’s Transform to:
Position: (0, 1, 0)
Rotation: (0, 0, 0)
Scale: (1, 1, 1)
Now select your sphere, and at the Inspector window click the AddComponent button at the far bottom, find the PlayerController component and add it.
In addition to it, it should have automatically added a RigidBody and MovementScript component together.

You might also want to change the Camera‘s Transform so it has those values:
Position: (0, 13, -12)
Rotation: (46, 0, 0)
Scale: (1, 1, 1)
This will allow you to see what is happening in the Game view.
So now just click Play and test it!
ERRORS EVERYWHERE!
Your Console window should be looking like this:
 Calm down, this is actually a good thing! Because this means the error was recognized by the software, and you now have a way to know exactly what went wrong.
If you check at the bottom part you will notice two blue texts, those are the Call Stack of your error. This is like a history of what happened before the error appeared.
The top-most one (Assets/PlayerController.cs:14) is exactly where the error was encountered (14 being the line), and every line bellow it will show you from where the previous method was called from. So now we know the error occurred at line 14 of PlayerController.cs, at the Move() method, after being called by the line 9 at the Update() method.
Clicking on it will take you directly to the line in question, and the name of the error “NullReferenceException: Object reference not set to an instance of an object” means that it tried to access something that is null.
The line is:
movementScript.Move(Vector3.forward * Input.GetAxis(“Vertical”) + Vector3.right * Input.GetAxis(“Horizontal”));
Accessing something in csharp is done by the . operator, which means the culprits are either movementScript, Vector3 or Input, because they are the only ones being accessed.
In this case both Vector3 and Input are a type, this mean that if they didn’t exist you would be getting the error even before pressing play, because you were trying to use something that didn’t exist in the first place.
Why it lets movementScript go even if it is null? Because it is a variable we declared ourselves to our class, the compiler has no way to know it would still be null by the time we tried using it.
There are many ways to fix that error, but since it was done in purpose by me at the first place, just add this method to the PlayerController script:
private void Awake() {
    movementScript = GetComponent<MovementScript>();
}
Awake is a method that is magically called by Unity on all objects that come into play, but that is out of the scope of this tutorial. So for now just know movementScript is being set as the Movement Script component that is on our sphere.
Now let’s Play again, try moving our sphere with WASD and jumping with Space!
And nothing happened…
You don’t see anything in the Console window, right? Now you encountered a coder worst nightmare, the silent error.
Basically this mean you are on your own, for all your application cares it is actually working perfectly fine.
So, let’s start debugging!
Debugging: Checking your data
I know it sounds lame but the first step to debug your problem, is actually checking whatever data you are trying to feed to your code is actually right.
You will absolutely not believe how many hours of frustration can be generated by just having pressed the wrong button, having an empty file, a file with the wrong name, the wrong image, the wrong file extension, wrong numbers, etc…
So let’s check the things we added to our sphere:
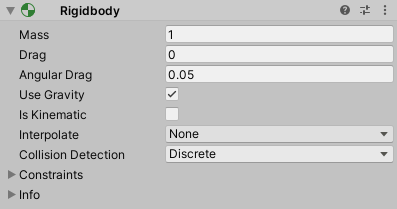 Rigidbody is an important piece for the physics system, it is the component that tells Unity how our object is gonna be interacted by physics!
If you don’t know what each field does, I recommend looking at the documentation. This is valid for any software you are using! Just because something’s name seems obvious at first glance, does not mean it does what you think it does.
Mass defines how much mass our object have, bigger mass implies we need stronger force to move it, which could give us our problem, but you will find that even changing it to a very small value changes nothing. So it is probably not this.Drag is kind of a resistant this object shows to moving, but it is zero, so it is currently offering no resistance.
Angular Drag is the resistant to rotating, but even if you set it to zero nothing will change.
Use Gravity actually does what it sounds, checking it makes your object falls to the gravity set in your project’s setting.
Is Kinematic is complicated, but in a nutshell means your object won’t be affected by external forces, toggling it will also do nothing.
Interpolate makes it so changes made to this object’s transform are interpolated between frames, but is disabled and not what we are looking for.
Collision Detection is the method used by the physics engine to detect collision, but again nothing will happen even if you change it.
Constraints are like rules you can set on what is allowed to be changed on this object’s transform by physics, sounds promising! But again you will find that all of them are already turned off.
So nothing seems to be out of order at the Rigidbody, let’s check our other new components then:
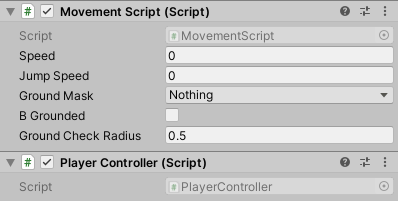
Player Controller have no data, so it’s okay.
Movement Script have some, so let’s see:
Speed: 0
This seems important, zero? It might means our object have no speed, let’s try changing it to something like 10.
Jump Speed: 0
Zero again? put 10 too.
Press play again and test it!
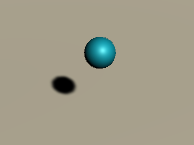
Something is happening!

It is moving! But… is this correct? It kinda seems to be moving too slow. Also pressing space will not make it jump, why is that?
Let’s first try to check why it’s moving so slowly, what happens if we just increase the speed?
In those cases it’s better to increase in really big numbers so the result is more pronounced, let’s try 10 times what we have, at 100 speed.
It moved faster, but not much right? Is it really 10 times faster? Hard to tell, maybe try putting 1000 into both speeds?

It finally moved fast, but it’s still not jumping. So what is wrong?
Debugging: Checking if your methods are actually being called
Another good step is checking if what you wrote is actually being called in the code.
There is no point in writing lines and lines of code, nothing happening, and not being aware that you actually forgot to call your method somewhere.
I will also take this opportunity to introduce a way to check it that is fast and does not require any external tools, Logs!
Remember the Console window? What shows there are Logs generated by the application, and you can insert your own by using the Debug class!
So, to be sure insert those logs into PlayerController.cs:
void Update() {
    Move();
    Jump();
    Debug.Log("Update");
}

void Jump() {
    Debug.Log("Jump1");
    if (Input.GetButton("Jump") && movementScript.bGrounded) {
        movementScript.Jump();
        movementScript.bGrounded = false;
        Debug.Log("Jump2");
    }
}
And in the MovementScript.cs:
public void Jump() {
    _rb.AddForce(Vector3.up * jumpSpeed);
    Debug.Log("Jump3");
}
Now press Play and try again!
Word of code: Remember to remove your Debug.Log calls, as they both can create visual trash if you wish to debug something later, and are computationally expensive, making your game slower.
My Console is too full!
This is because some of our Logs are being generated every frame due to the Update() method, you can check the Collapse toggle to make all the messages that are the same be stacked together:
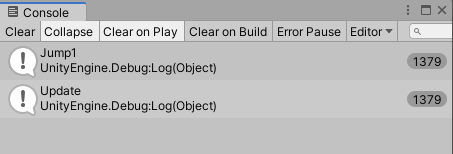
By checking it we can see that only Update and Jump1 are being written. This mean that for some reason our movementScript.Jump() is never called at all.
Now that we know what is wrong, let’s check the requirements for the Jump() method to be called:
Input.GetButton(“Jump”) && movementScript.bGrounded
A way to check if the Input.GetButton(“Jump”) part is working, is just to remove everything other condition.
If you do you gonna be able to see that our sphere actually flies as we hold the Space bar, probably because we removed the checking if the sphere was on the ground part.
If you go back to our first step of checking the data, you gonna notice B Grounded is shown in Movement Script component.
But marking it and playing will just unmark it as soon as you press Space…
What now?
One thing we never checked was Ground Mask, what is it after all?
If we go into our MovementScript.cs file and check where it’s used, we see it’s a call to Physics.Raycast:

After checking our documentation we can find out that it’s a Layer Mask, used to selectively choose which Layer the Raycast is gonna hit.
And the Raycast seems to “Returns true if the ray intersects with a Collider, otherwise false“.
While explaining how Raycast works is out of the scope of this tutorial, you should be aware that it is setting the value of bGrounded based on it. Considering that we can only jump if bGrounded is true, we can check the options we have for it:
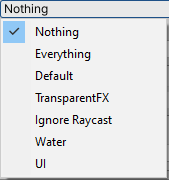
Does this mean the Raycast is hitting nothing? Well there are a lot of options here, but as I said try to choose something that is a big difference from what you were doing, so you can see the effects of your change easier. So let’s mark Everything!
Now hit that Play button again.
It jumped! But it’s kinda weird…
Everything seems wrong at this point, the movement, the jump, the gravity… But how much of it is our fault? How do we check everything?
Debugging: Create a control group.
Wikipedia says:
A scientific control is an experiment or observation designed to minimize the effects of variables other than the independent variable. This increases the reliability of the results, often through a comparison between control measurements and the other measurements.
And what we gonna do is create a new sphere (3D Object > Sphere), and add a Rigidbody Component to it.
Set it’s Transform to:
Position: (1, 10, 1)
Rotation: (0, 0, 0)
Scale: (1, 1, 1)
And if you click Play, you can check that it falls way faster than our own sphere.
This means that our problem is indeed caused by whatever our scripts are doing.
How do I find the problem then?
It’s time to bring the nice toys to play.
Debugging: Entering debug mode
Fortunately Visual Studio comes equipped with a variety of tools that can help us in our Debugging, let’s enter the debug mode!
At the top of Visual Studio you will find this bar:
![]()
Click Attach to Unity and wait until it finishes loading, and done. You are in debug mode!
If for whatever reason the bar or the button are not there, you can achieve the same thing by clicking in Debug at the top menu, then Attach Unity Debugger and selecting your open Unity project.
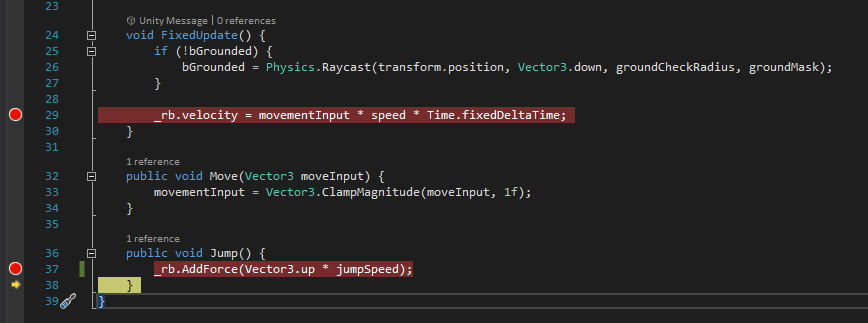
The first thing we gonna learn are breakpoints and how to navigate through your code while in debug mode.
If you check on the left area, at the left of the line numbers, you can see a very small gray bar, clicking on it will insert a breakpoint at that line in your code:
Do add one breakpoint exactly there, at line 37 of MovementScript.cs.
Now click Play and try to jump.
My game froze!
This is perfectly normal, your visual studio should be like this now:

This mean that your game has been frozen at this exact point in execution, and now you have the powers to know exactly what is going on at all moments.
First thing you are immediately able to do is hover your mouse on anything in the code to see what is the current value they hold:
You also got two new windows, one of them is the Call Stack. Remember when I was talking about the Console window?
Here it serves the same purpose, it shows you from where the code came from until it reached the current line:
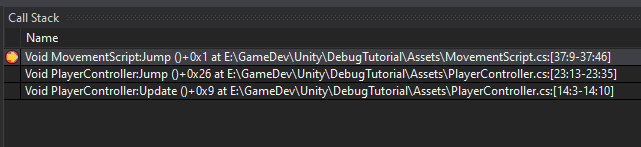
Double clicking on it will take you to the exact line the call happened.
The other one is the always useful Watch:
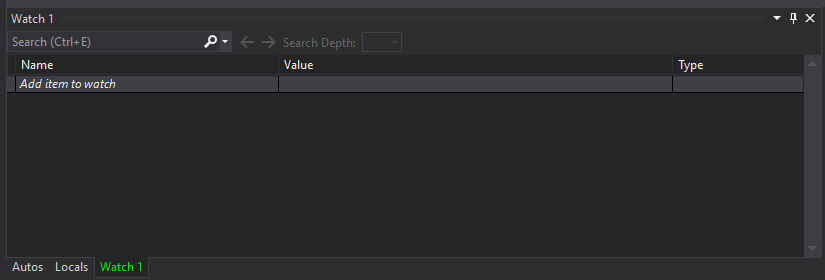
Kinda empty, right? But here you can type from variables, to properties to even methods and check in real time the value they have!
It’s extremely useful and I really have no words to describe how useful it truly is.
Bellow you can see three little tabs called Autos, Locals and Watch 1. All three of them act like the Watch window and just have different behaviors:
Autos will try to show you some values it automatically decided were worth of your attention.
Locals will show the values held at the local scope.
Watch 1 is just the first user tab, you can have multiple Watch windows if you wish.
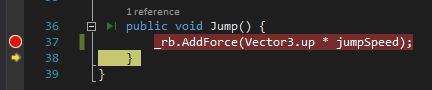
Now back into our frozen step:
Our code is currently paused at this line, beware that this mean this specific line has not yet been executed.
We now have control on how we advance through our code by using those buttons or hotkeys:
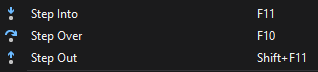
Those are hard to explain, but very easy to understand once you try it.
Step Into: This will enter the next execution of code and continue the debugging inside it (like a method), if there is nothing to enter it will just behave like Step Over.
Step Over: This will execute the current line of code and jump to the next one.
Step Out: Returns to the line of code where our current execution has been called from, this could mean the method from which it were called.
In our case AddForce is an internal method of the engine, so we cannot debug inside of it. So pressing either Step Into or Step Over will do the same.
So press Step Over.
This should have advanced the execution to the next line, that in our case is just the end of the method:
If we check the _rb.velocity value by using the Watch window, we can see even after the call it’s still zero.
But maybe physics take a while to update right? I mean, there is such as thing as the physics update step, called FixedUpdate.
So let’s add a breakpoint there too:
Now we can press the Continue button, this command restores the normal execution of code.
Until it hits another breakpoint:
It seems nothing changed yet, let’s hit Continue again!
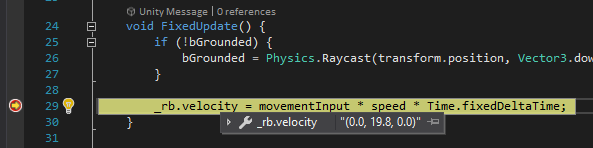
We got something, we have velocity at the vertical axis! We have a jump! Let’s see what happen at the very next line:
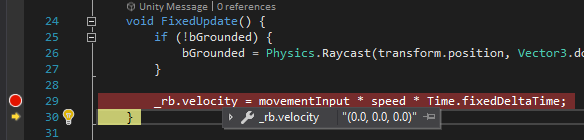
Wait, it’s zero again! Why? We are assigning the velocity to that equation, what is that equation at all? Let’s try putting it in the Watch:
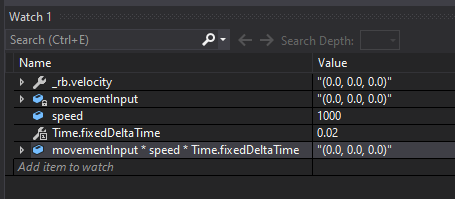
Ah, so it seems at every FixedUpdate we are setting the rigidbody velocity to that equation, therefore nullifying whatever forces had been applied to it.
Also if we checked out documentation like we were supposed to, we would find two things:
- We are only supposed to change the velocity if we want immediate changes in it.
- The velocity in Unity is units per second
So another error is that we shouldn’t be multiplying the speed by Time.fixedDeltaTime, because velocity is already expressed in units per second.
Some versions of Unity or Visual Studio may require you to stop debugging before you are allowed to edit your code again:
![]()
Now we have many ways to fix this code, but to keep the same feeling we had before I’m gonna keep using the _rb.velocity way:
using UnityEngine;

[RequireComponent(typeof(Rigidbody))]
public class MovementScript : MonoBehaviour {

    Rigidbody _rb;

    public float speed, jumpSpeed;

    [SerializeField]
    LayerMask groundMask;

    public bool bGrounded;

    [SerializeField]
    float groundCheckRadius = 0.5f;

    Vector3 movementInput;

    private void Awake() {
        _rb = GetComponent<Rigidbody>();
    }

    void FixedUpdate() {
        if (!bGrounded) {
            bGrounded = Physics.Raycast(transform.position, Vector3.down, groundCheckRadius, groundMask);
        }

        Vector3 nVelocity = _rb.velocity;
        nVelocity.x = movementInput.x * speed;
        nVelocity.z = movementInput.z * speed;
        _rb.velocity = nVelocity;
    }

    public void Move(Vector3 moveInput) {
        movementInput = Vector3.ClampMagnitude(moveInput, 1f);
    }

    public void Jump() {
        _rb.velocity = new Vector3(_rb.velocity.x, jumpSpeed, _rb.velocity.z);
    }
}
And set our Speed and JumpSpeed values back in our Inspector to 10.
Let’s press Play again!
It works!
Congratulations! Now you know the most common ways to debug, and I hope with this newfound knowledge will treat you well in the future.
Remember that while I used Unity to demonstrate, those method are generic and will work in almost anything else, so good luck!
Thank you for reading my tutorial!
I hope this tutorial was of help to you, and if possible a donation of 1$ may be of great help on aiding the development of future tutorials:

https://www.patreon.com/TinyBirdGames
Thank you very much!
