Welcome back to all returnees, and welcome to all new faces!
Remember that those tutorials expects you to have some kind of programming experience, and they reflect my personal experience and may not agree with everyone.
What are Interfaces?
I’m glad you asked, to be honest I didn’t know how to start this tutorial if not for this question!
Interfaces are, akin to their name, a way to dictate how to interact with something.
A dictate wat?
Ok that wasn’t very self-explanatory was it? So let’s take a real life example: computers.
Let’s sit on front of the computer, how do you interact with it? You see a mouse, you see a keyboard, do you know how to use the computer now? Great! That is it!
It means that given a mouse and a keyboard, you expect to be able to use any device that have those peripherals in the same way!
And in the programming world, the compiler makes sure that any class that have an interface, have the exact same way of using it as any other class that have that same interface.
 In a way, all peripherals are the computer’s interfaces
Oh, how does it do that?
It, hm, prevents you from compiling until you manually make it have the specifications-
…
What? You wanted magic? We ain’t running a fantasy scenario here.
Why would I use them so?
Interfaces are a great way to add polymorphism, and if you didn’t get that, imagine that you are making a game where the user can interact with a variety of things.
They can milk a cow, they can access a computer, they can get mail from a letterbox, talk to npcs, and you do all that with the same button press.
From a variety of ways that could be implemented, an Interface is one of them! You could declare something like:
interface IUsable {

    void Use();
}
(The “I” prefix is commonly used in interfaces names to visually distinguish them while coding, you will probably notice why later)
And now any class that you create that can be interacted with:
class NPC : Character, IUsable {
    public void Use() {
        // Your implementation here
    }
}
This declares a class of type NPC, that implements the interface IUsable.
Please note that if you implement a Interface, you are required to declare all the methods in said Interface as public, not writing the methods or not declaring them as public will both throw errors and prevent you from compiling your code.
Makes some sense right? Why would you implement an Interface, a way for external access for your class, and not allow that same access?
What are we making today?
Wh- Why do I have to make a game every time, I swear-
Ok, so we will be making a game where you shoot things, you shoot everything, shooting is how you interact with the world, and the world accepts your bullets.
To sum it up, I will add:
– Destructible boxes.
– Panels you can shoot to interact with something.
– Doors you can shoot to open.
And I will try to use different ways to interact, even while using Interfaces, to show some examples.
Again, you will be able to download the whole project at the end of this tutorial.
Let’s go!
First we will create our Interface:
public interface IInteractable {

    void Interact();
}
Nothing much to see here, a tried and true Interface, that declares a method called Interact that returns void.
Now onto a script we gonna put into our player object:
using UnityEngine;

public class PlayerController : MonoBehaviour {

    public GameObject bulletPrefab;

    private CharacterController charController;

    private float nextBulletTime;

    private void Awake() {
        charController = GetComponent<CharacterController>();
    }

    // Start is called before the first frame update
    void Start() {

    }

    // Update is called once per frame
    void Update() {
        // 3f is the velocity we will be moving.
        Vector3 movementInput = new Vector3(Input.GetAxis("Horizontal"), 0, Input.GetAxis("Vertical")).normalized * 3f;

        if (movementInput.sqrMagnitude >= 0.05f) {
            if (movementInput.x > 0) {
                transform.rotation = Quaternion.Euler(0, 90, 0);
            } else if (movementInput.x < 0) {
                transform.rotation = Quaternion.Euler(0, 270, 0);
            }

            if (movementInput.z > 0) {
                transform.rotation = Quaternion.Euler(0, 0, 0);
            } else if (movementInput.z < 0) {
                transform.rotation = Quaternion.Euler(0, 180, 0);
            }

            charController.Move(movementInput * Time.deltaTime);
        }

        if (Input.GetButton("Fire1") || Input.GetButton("Jump")) {
            if (Time.time < nextBulletTime) {
                return;
            }
            nextBulletTime = Time.time + 0.5f;
            Instantiate<GameObject>(bulletPrefab, transform.position + transform.forward, transform.rotation);
        }
    }

    private void LateUpdate() {
        Camera.main.transform.position = transform.position + new Vector3(0, 8, -6);
    }
}
This script basically takes our inputs and moves a GameObject that have a CharacterController component attached to it, it will also fire instances of bulletPrefab at nextBulletTime seconds intervals.
So you will need an object that have a CharacterController component on it, and add this script to it.
Next create a prefab that is a sphere, with a SphereCollider which isTrigger is on, and is a RigidBody that useGravity is false.
Put that prefab in the bulletPrefab field at our player object:
 Add this script to the prefab:
using UnityEngine;

public class PlayerProjectile : MonoBehaviour {

    private Rigidbody rbody;

    private void Awake() {
        rbody = GetComponent<Rigidbody>();
    }

    private void Update() {
        // 3f is the velocity we will be moving.
        rbody.velocity = transform.forward * 3f;
    }

    private void OnTriggerEnter(Collider other) {
        // You can call GetComponent and get an Interface like it was any ol' component
        IInteractable interactable = other.gameObject.GetComponent<IInteractable>();

        if (interactable != null) {
            interactable.Interact();
        }

        Destroy(gameObject);
    }
}
This one will simply keep a constant forward velocity, and when it’s trigger area colliders with something it will call .Interact() on it, if it’s a IInteractable, and destroy itself regardless if it called the method or not.
You might have noticed that you can use GetComponent to get a instance that implements an Interface, that is really handy!
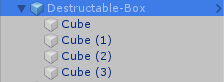
Now the boxes are kinda hard to explain without you seeing them, but they are basically made of many rectangles with their own collision and rigidbody, and said rigidbody set to Kinematic. This mean it won’t be affected by physics but can affect other objects, we use that to prevent them from falling over, until we disable the kinematic flag and explodes them, making the box fall over.
All those rectangles are them inside another GameObject that have a BoxCollider covering the whole box, I use that to both make the whole box function as one single physics object and so our projectile can call the .Interact() method and make it explode into it’s individual rectangles.
 The hm, cube bone goes into the box bone…
In the containing GameObject I create a script:
using UnityEngine;

public class DestructableBox : MonoBehaviour, IInteractable {

    public void Interact() {
        Transform child;

        while (transform.childCount > 0) {
            child = transform.GetChild(0);
            child.transform.SetParent(null);
            Rigidbody cRBody = child.GetComponent<Rigidbody>();
            cRBody.isKinematic = false;
            cRBody.AddExplosionForce(100f, transform.position + Random.insideUnitSphere * 0.3f - Random.insideUnitSphere * 0.3f, 1f);
        }

        Destroy(gameObject);
    }
}
This one will iterate through all childs of it, remove them from the inside of the containing GameObject, apply a little random force so it seems to explode and then destroy the containing GameObject itself, so it no longer collides with anything.
The doors are even more complex in terms of stuff going on without code, so I will refrain from trying to explain everything going on and do an overview.
In a nutshell, the door itself is inside another GameObject, which has an Animator that can play an Animation which makes the door object moves out of the way.
![]() Oh no no, Door is a regional dialect, we are opening Object
Oh no no, Door is a regional dialect, we are opening Object
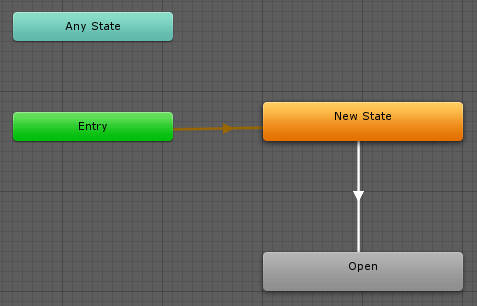
It is set that way because it allows us to copy and paste the door and maintain the same Animation, if we didn’t, when copied the door and placed it somewhere else and played the Animation, the door would teleport to it’s original position and open, as animations are always relative to it’s parent object.
It’s script is:
using UnityEngine;

public class Door : MonoBehaviour, IInteractable {

    private bool bOpen = false;

    public void Interact() {
        if (bOpen) {
            return;
        }

        bOpen = true;
        transform.parent.gameObject.GetComponent<Animator>().Play("Open");
    }
}
A boolean to prevent the door from playing the opening animation multiple times, then a call to start playing the Animation.
This script goes in the Object, and not the Door parent transform.
Now to make things a little different, I’m making a panel that opens a door, instead of shooting the door you have to shoot the panel.
Not only that, I’m doing so by ways of UnityEvents, which are events (covered by this tutorial) implemented by the Unity3D engine.
using UnityEngine;
using UnityEngine.Events;
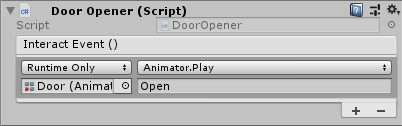
public class DoorOpener : MonoBehaviour, IInteractable {
public UnityEvent InteractEvent;
public void Interact() {
InteractEvent.Invoke();
}
}
This one simply invokes the given UnityEvent when interacted with, simple no?
You can set the event you want to trigger in the Inspector:
 If you wanted you could make all 3 doors open by just adding more events here!
To demonstrate how you could use UnityEvents for a variety of things, I added a little eye-candy to the end of the stage, and use the same DoorOpener script on it!
To see how the whole game is played and how to set-up the GameObjects and others, download the full project.
Full Project Download:
You can download the project I used to test here.
Thank you for reading my tutorial!
I hope this tutorial was of help to you, and if possible a donation of 1$ may be of great help on aiding the development of future tutorials:

https://www.patreon.com/TinyBirdGames
Thank you very much!
